
Inside: An easy handmade gift – a fingerprint dish for Father’s Day.
Finding the perfect gift for the men in your life is hard! So when you are suddenly in charge of coming up with all of the perfect gift ideas from the kids each year, it just adds to the stress.
There is always plenty of choice in the shops but I like to try and get the kids involved in making something.
However, that also provides its own challenges as you need to make sure the craft is simple enough for the kids to be able to make with minimal help but that is also effective enough to be treasured forever.
My husband loves useful things so I also try to steer clear of useless things and find things that he will actually use and enjoy.

Of all the things my kids have ever made for their daddy, this has been the most used and most appreciated.
It now sits on his bedside table and it will always be a lovely keepsake and reminder of how little they once were.
It was so easy to make, the kids had fun and it is indeed something he will treasure forever. I wanted to pass on how we did it so you can create the same.
How to make a fingerprint dish
If you are constantly finding piles of cash left around the house (why do they have to empty their pockets randomly?) then this craft idea is perfect for you!
What do you need?
I am not one for complicated crafts with lots of elements so this is a nice and simple project with minimal elements to gather together.
You will need:
Clay (we used air-drying clay)
Paint in their favourite colour
Rolling pin
Paintbrushes
A pencil
Making the dish

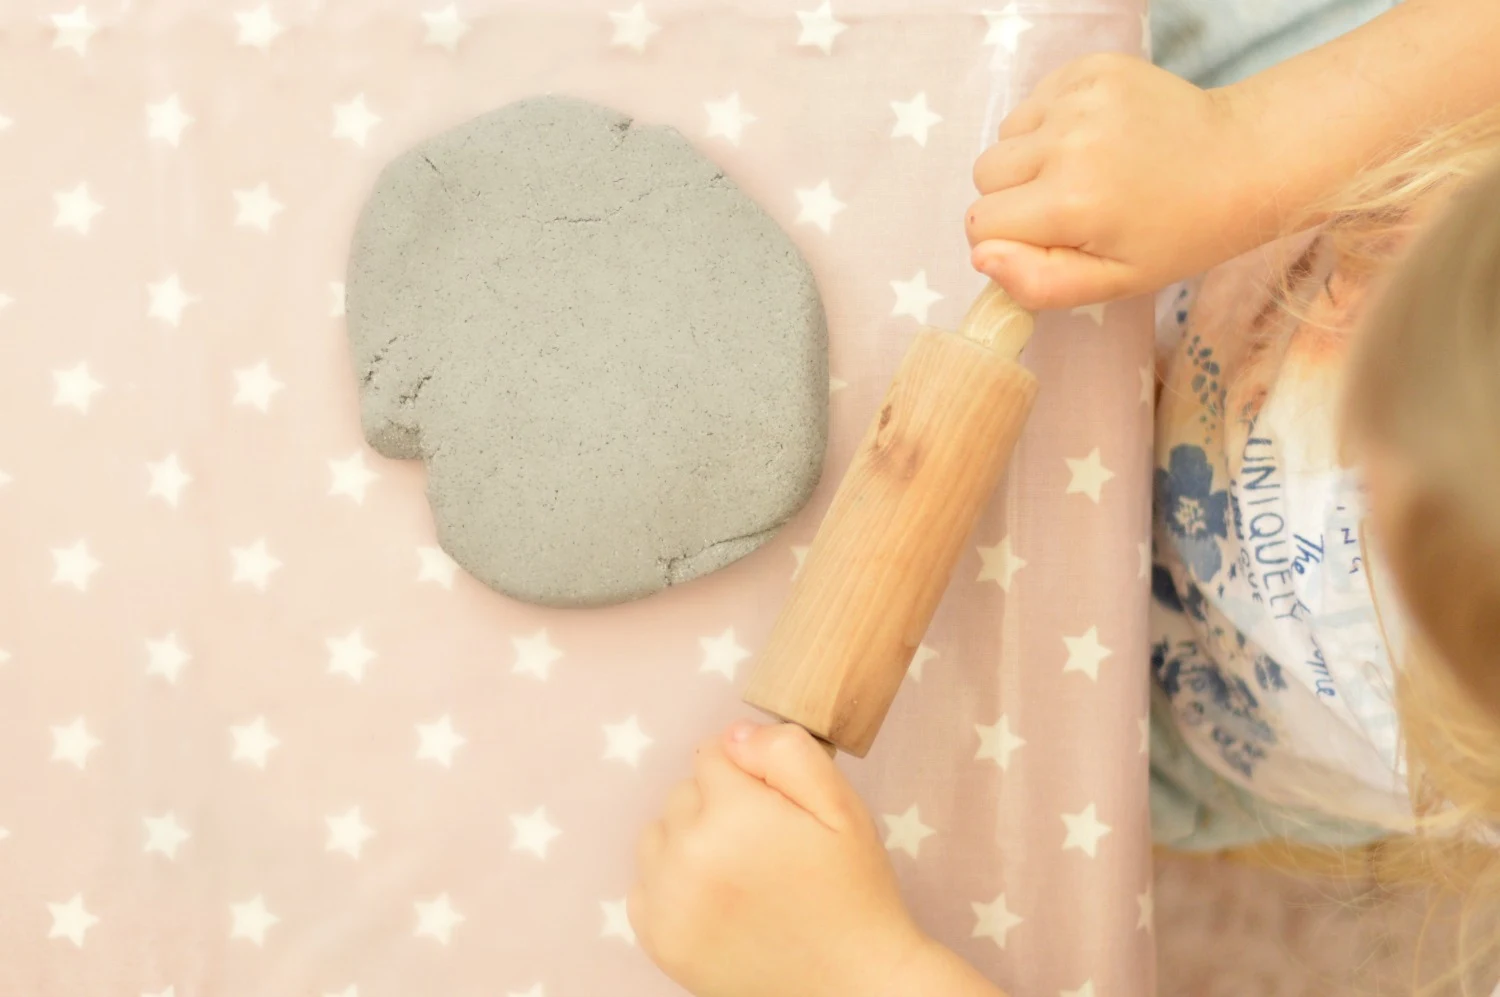
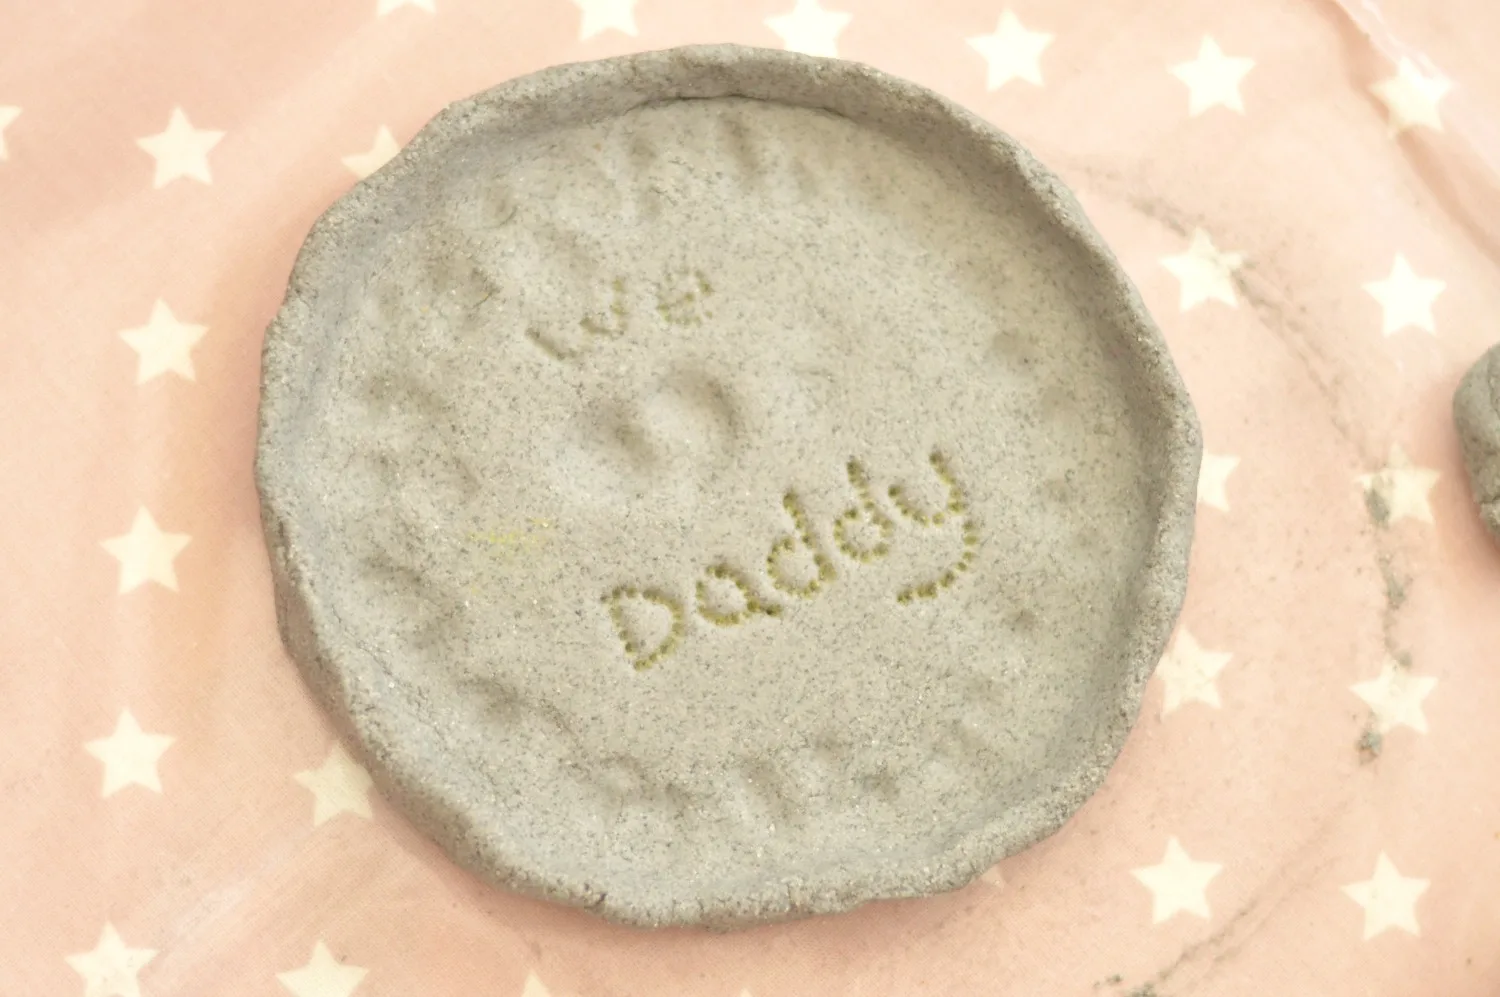
The clay we used is from Baker Ross and is an air-drying clay. It comes in a lump so the first thing you have to do is roll it out into a circle to a depth that is nice and solid (you don’t want it to be too fragile).
We used a rolling pin and they were happy to roll away to their heart’s content. I helped them to make sure it was round but other than that they were able to do it themselves.

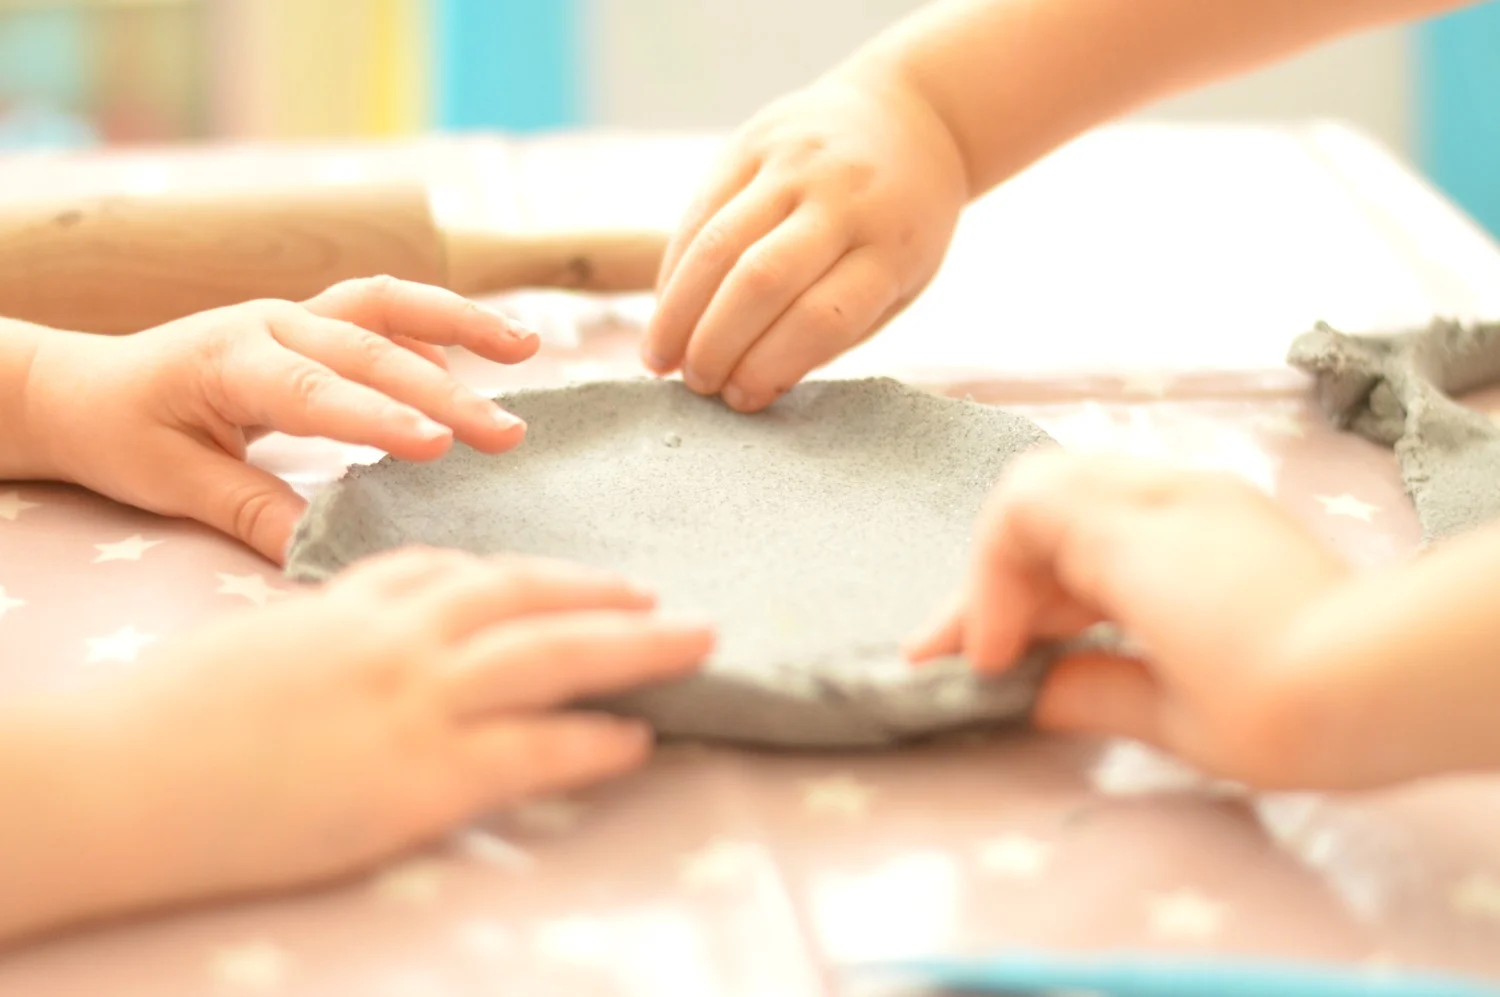
The next stage is to fold up the edges to make it into the dish. Or you could split the clay into two pieces to create smaller plates or even bowls if you moulded it upwards more.
As they did this, they left little fingerprints and at first I tried to straighten them out but actually they added to the beauty of the piece so we left them.
If you really didn’t want a wonky edge then you could always use another plate and mould the clay over the back of it – it will then take on the shape of the plate to create a natural curve.

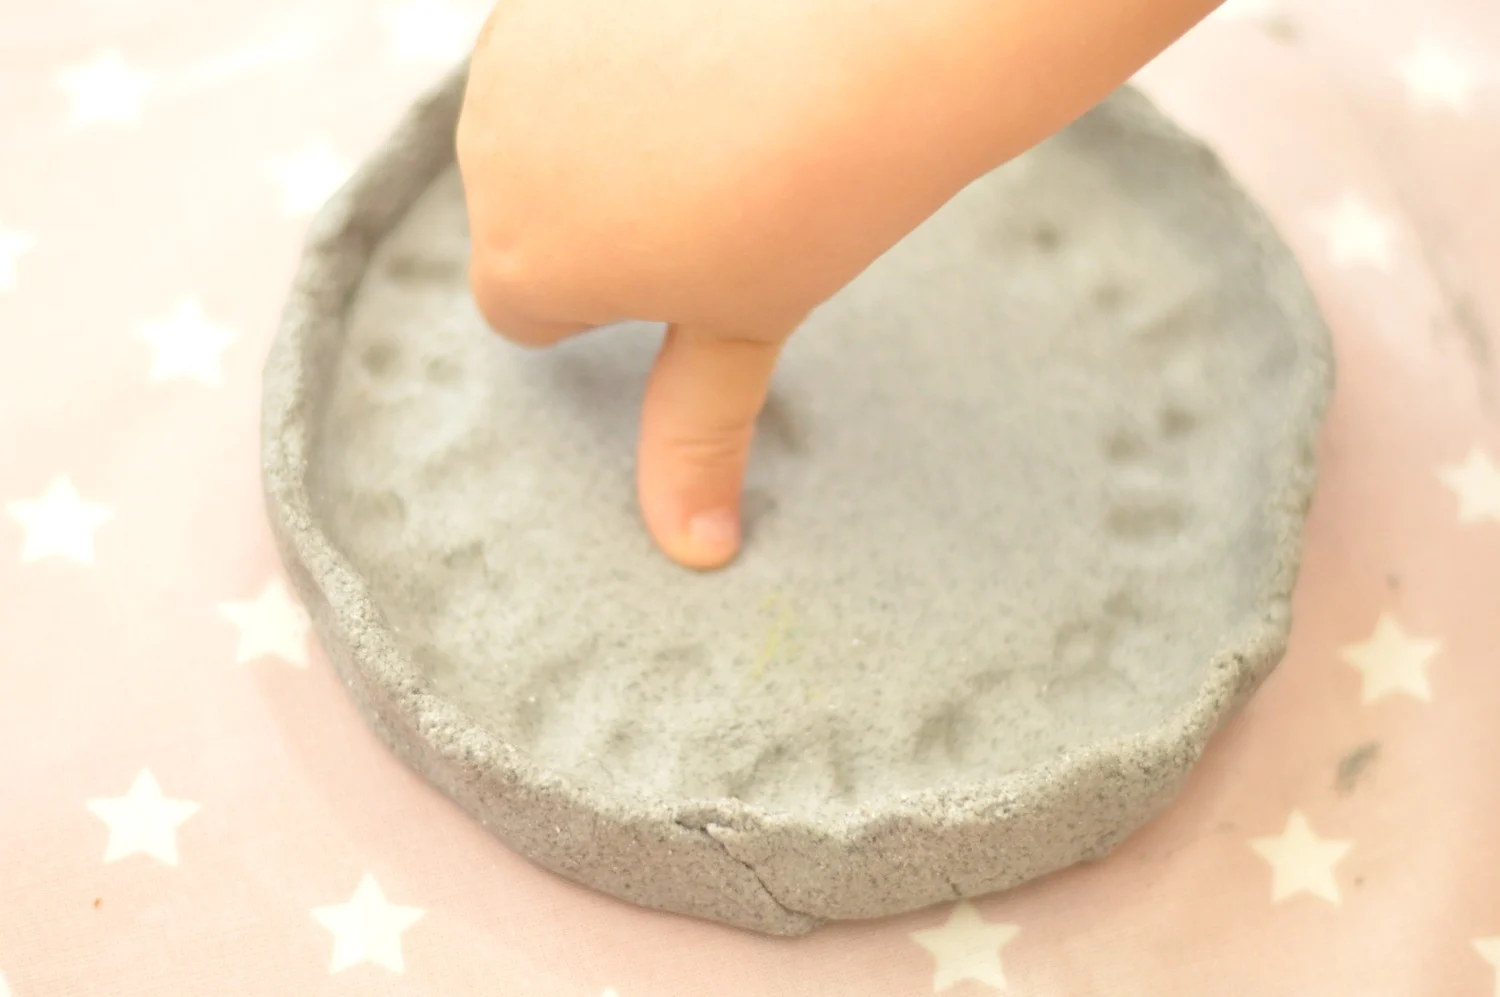
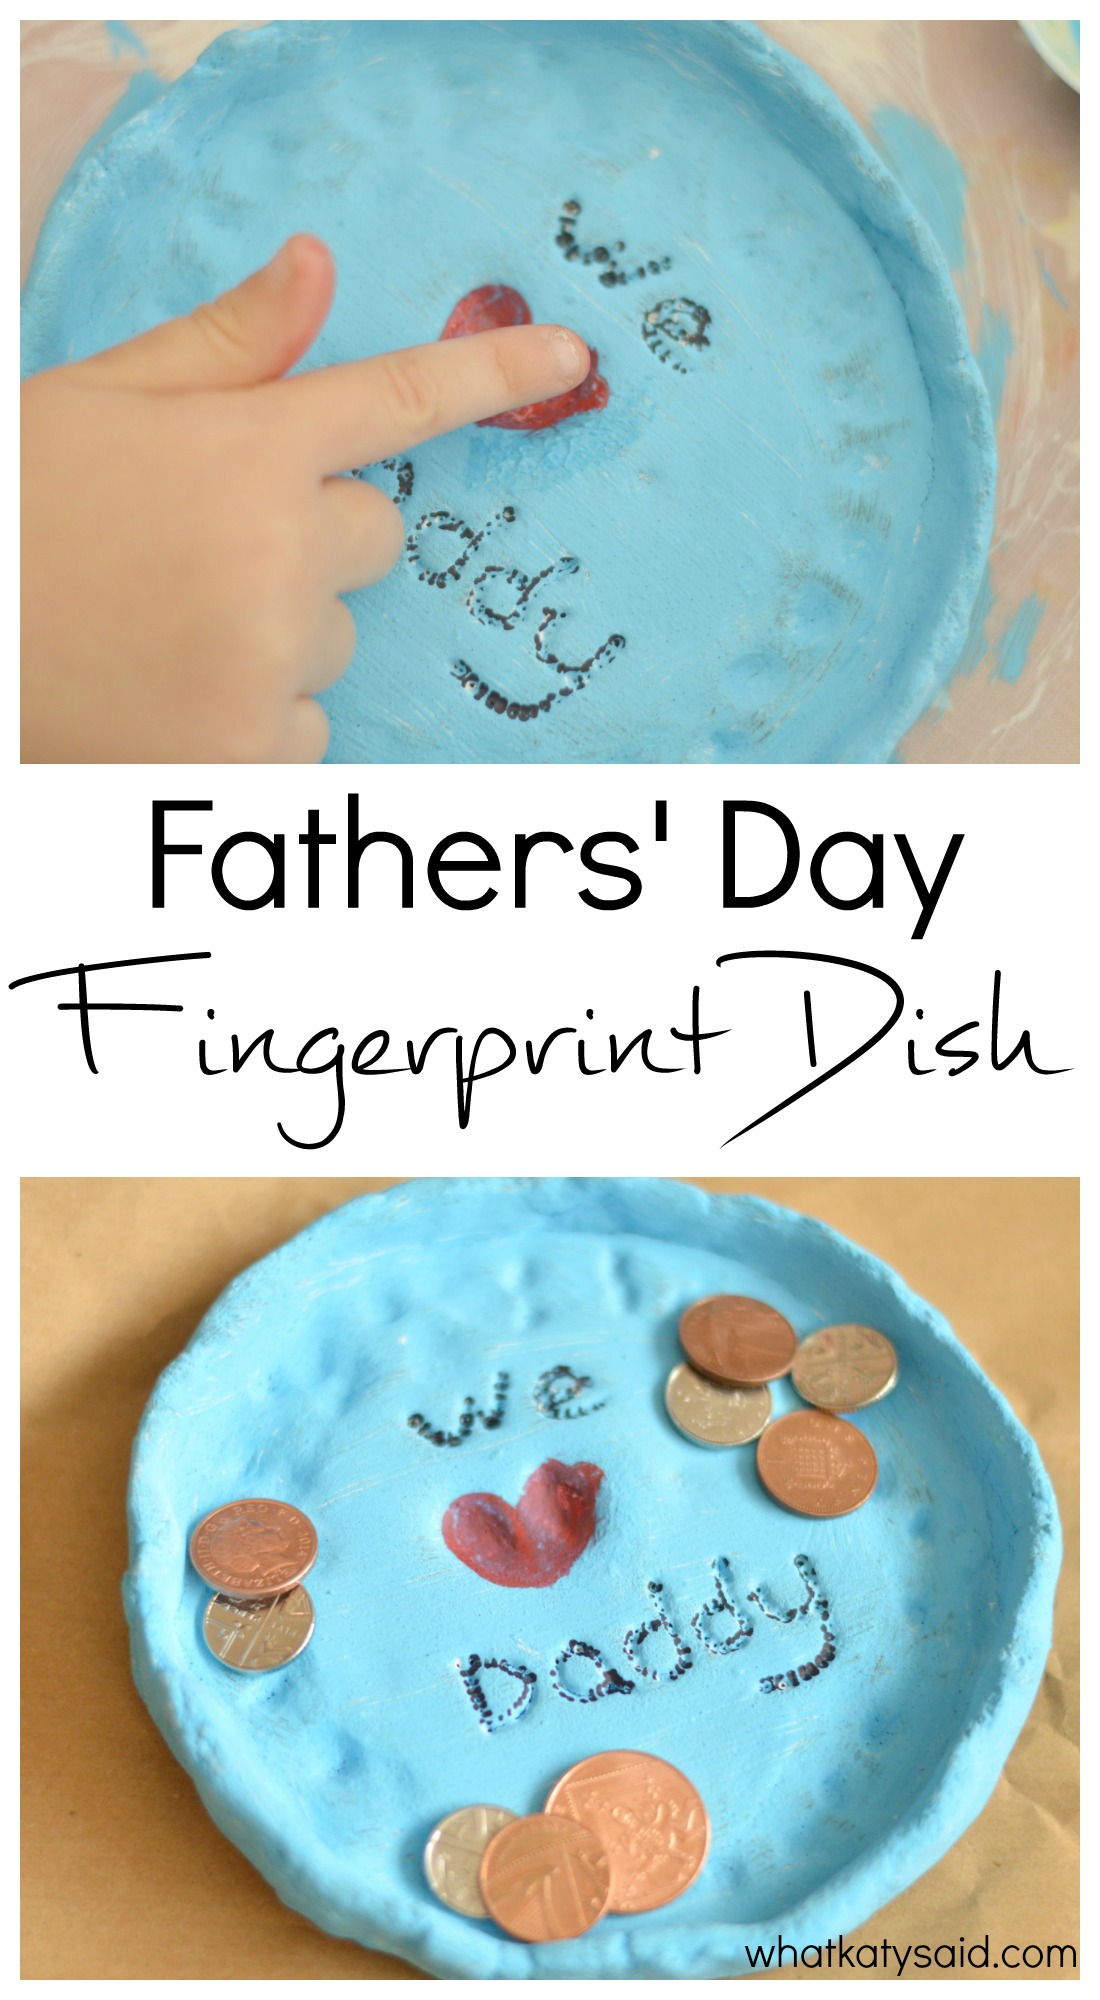
I then wrote the ‘we’ and ‘daddy’ using a little pencil and left a space for them to make the heart with their thumbs. With two girls, they did one thumb each to create the heart shape.
It is completely up to you what you put in the middle of course, you could always put use a handprint to capture the size of their tiny hand forever.

You have to leave the dish to dry out and harden for a few days but then it is ready to paint.
Different clays have different drying times so make sure you make it with plenty of time to spare before you need to give it to the recipient.


Once it is completely dry and hard, it is time to get painting.
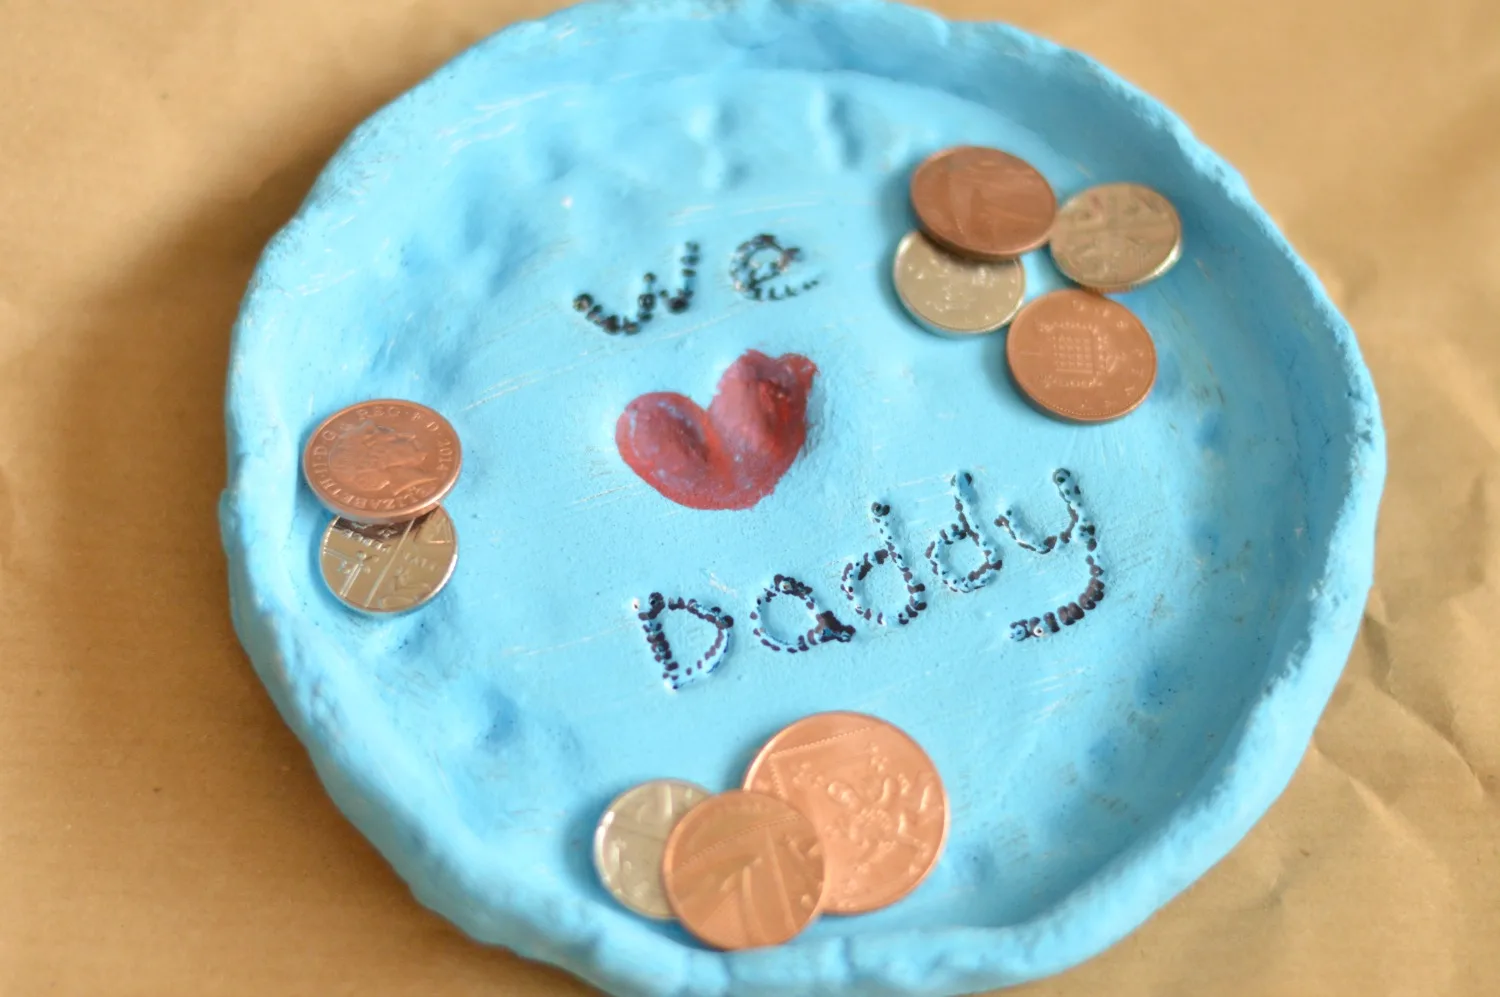
We painted it white at first to cover up the dark clay colour and then were able to paint it blue – daddy’s favourite colour.
I would recommend a light colour so that when you pick out the writing, it will show up easily.

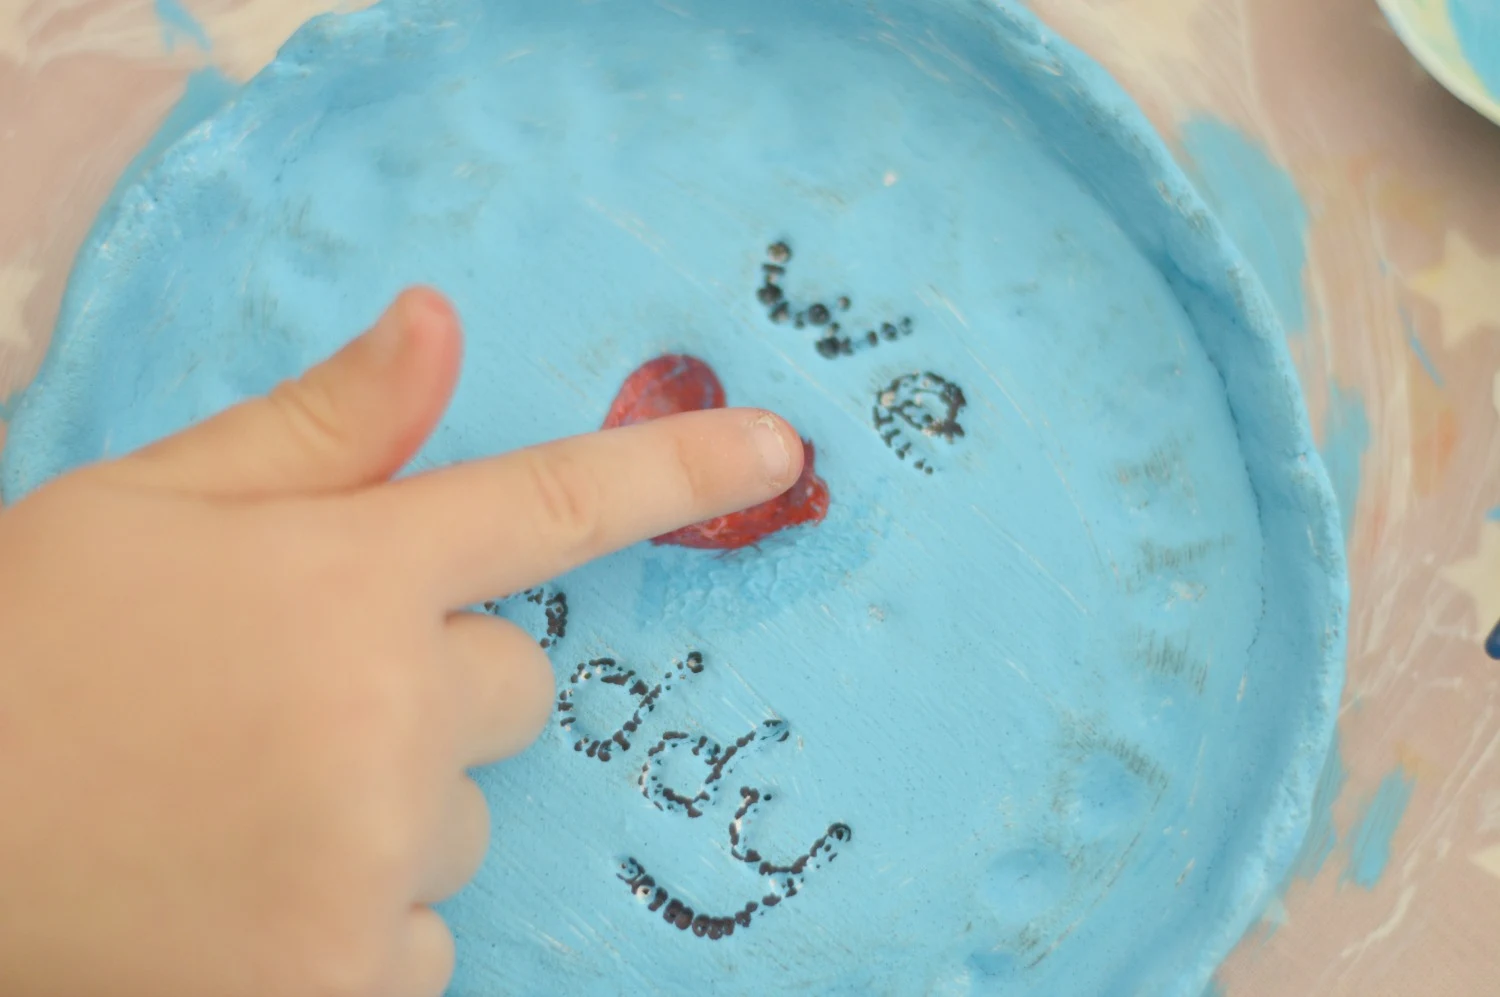
The finishing touch was then to use a darker colour to go over the pencil hole writing and use a red for the heart.
Daddy will now have a dish to keep his money in rather than scattering them all around the house to lose.

If you are looking for a Father’s Day handprint gift then this is such a lovely alternative to the standard handprint crafts you may come across.
Now you just have to find the perfect card!
Father's Day Fingerprint Plate


Fingerprint dish for Father's Day
Materials
- Clay (we used air-drying clay)
- Paint in their favourite colour
Tools
- Rolling pin
- Paint brushes
- Pencil
Instructions
- Roll out the clay into a circle. You want it to be a good depth so as to not be too fragile once it is dry.
- Fold up the edges to create a lip.
- Using the pencil, write 'We' and 'Daddy' leaving a space in the centre for the thumbprint heart.
- Using their thumbs, make a heart shape in the centre.
- Wait for the clay to dry out. Ours took 2-3 days.
- Paint the dish using their favourite colour, picking out the writing and the heart in a different colour.
Notes
If you prefer, you could use a handprint for the dish and skip the writing. It is just nice to create a useful gift but one that also holds a special memory such as the size of their little hands.
Frequently asked questions
What is the best clay to use?
We used air drying clay as it was much simpler to let it dry naturally. You could of course use normal clay and bake it in the oven. Just bear in mind that often the baking process can make it brittle.
How long will it take to dry?
Ours dried within 3 days left by the window with bright sunshine beaming in onto it. The clay will come with instructions to guide you but bear in mind that the thicker the object the longer it will take to dry.
So with a plate, it should be thin enough not to be too long.
What paint did you use?
We used normal poster paint as that is what we had. Any paint appropriate for use on pottery would be fine. You could also add a glaze to preserve the colour and give it a nice shine.
How big is it?
The plate is about 15cm in diameter and it is perfect for the job it was intended for.
How much clay did you use?
We had a 1kg block of clay and that was more than enough.
If you have enjoyed this post and found it useful, here are some ways you can say thanks and support What Katy Said:
1. Share this post with your friends.
2. Join the Decluttering Motherhood Facebook Group which is full of supportive women just like you.
3. Follow What Katy Said on the following platforms:
Thank you for your support as always.


Amy
Monday 13th of June 2022
My local store sells 500g or 1kg blocks.. I know you used 1kg.. do you think that was about right or would you go for 500g?
Katy
Monday 13th of June 2022
Hiya, It was such a long time ago I cannot for the life of me remember whether we used the whole block but I'm sure we did. You could always use what you need for the dish and then use the rest for something else. I always say better to have too much than too little x
17 Easy Father's Day Crafts for Toddlers to Make! {perfect for 2-5 year olds} | 2022
Tuesday 4th of January 2022
[…] Keep reading […]
45 Father's Day Deals and Ideas to Celebrate Dad - Coupon Chief
Friday 2nd of April 2021
[…] A fingerprint plate: For the dad who’s always losing his keys, this plate is the perfect gift. Use modeling clay to craft a small dish or bowl and customize it with your kids’ fingerprints! […]
Andrea
Friday 19th of June 2020
How did you do the writing? I am almost on that step with my kiddos. Thanks.
Katy
Friday 19th of June 2020
I used a pencil to prod holes xx
Crystal howell
Thursday 23rd of May 2019
What type of clay should I use for my preschoolers to make this craft